Today I showed you the slab technique. Use pieces of wood for support and a rolling pin to roll out slabs of equal thicknesses. Then you use the templates you created to cut out the correct shapes. These are the slabs that you will piece together to build your box. You can trim and refine the pieces to make them fit smoothly together, don't forget to slip and score each side as you join them together.
Remember to look at the handout for step by step instructions.
Tuesday, 25 March 2014
Monday, 24 March 2014
Mar. 24 – Clay Practice
Today we finished up the clay rhinos.
Make sure you have your templates for your box ready by tomorrow. Those of you who did not bring in bags, rags and a container, please do so.
Make sure you have your templates for your box ready by tomorrow. Those of you who did not bring in bags, rags and a container, please do so.
Friday, 21 March 2014
Mar. 21 – Clay Practice
Today we started with the clay!

The goal today was to make a simple clay rhino. This is practice before we get into your clay boxes. Have a look at this video:
Next week we will start working your clay boxes.
Remember the most important thing about working with clay is proper clean up. Do not wash clay down the sink and scrub down the tables after use. Dried clay dust can be dangerous if inhaled, so make sure you keep your workspace clean.
Wednesday, 19 March 2014
Mar. 19 – Clay Box Templates
Today I showed you how to make templates for your clay boxes. These are the life-size designs that you'll use to know what size to cut our your clay to. Have a look at this handout for thorough instructions on how to make a clay box.
Handout: Clay Box Instructions
Your thumbnails should be finished today and your templates done tomorrow. Friday we start with the clay!
Handout: Clay Box Instructions
Your thumbnails should be finished today and your templates done tomorrow. Friday we start with the clay!
Tuesday, 18 March 2014
Mar. 18 – Thumbnail drawings
Today you should be drawing your thumbnail sketches for your clay boxes. Remember you need to sketch the front, back, left and right views. Your thumbnail sketches should be in full colour.
Homework: Bring plastic bags and cloth rags to keep your clay moist while you're working on it. Also bring a plastic container with a lid to keep your work safe.
Here's an example of a clay box made by artist Katie Deits, clearly showing four sides of her work.
Of course, your box will be covered with your own gargoyles, gods and other monsters.
Homework: Bring plastic bags and cloth rags to keep your clay moist while you're working on it. Also bring a plastic container with a lid to keep your work safe.
Here's an example of a clay box made by artist Katie Deits, clearly showing four sides of her work.
 |
| "Gandhi, The Path to Freedom" Sculpture By Katie Deits c2002 |
Of course, your box will be covered with your own gargoyles, gods and other monsters.
Monday, 17 March 2014
Mar. 17 – Gargoyles and Gods
Welcome back form your break!
Today I introduced the next assignment:
Where is this famous gargoyle?

It's at Notre Dame in Paris! Gargoyles are mythical creatures built into buildings as a sign of protection. Around the world we see different sculptures that are built into buildings for religious, spiritual, or cultural reasons. Have a look at some of these examples:


Even on our own Parliament building in Ottawa:

Your task is to build a clay box and cover with sculptural images of mythical creatures. As some examples, use the internet to search for Romanesque Gargoyles or classic Greek gods. You can also draw from any cultural background you choose. You will need to sketch some thumbnail plans to start with and show that you have done the background searches.
Have a look at the handouts for full instructions.
Handouts
Today I introduced the next assignment:
Where is this famous gargoyle?
It's at Notre Dame in Paris! Gargoyles are mythical creatures built into buildings as a sign of protection. Around the world we see different sculptures that are built into buildings for religious, spiritual, or cultural reasons. Have a look at some of these examples:
Even on our own Parliament building in Ottawa:
Your task is to build a clay box and cover with sculptural images of mythical creatures. As some examples, use the internet to search for Romanesque Gargoyles or classic Greek gods. You can also draw from any cultural background you choose. You will need to sketch some thumbnail plans to start with and show that you have done the background searches.
Have a look at the handouts for full instructions.
Handouts
Wednesday, 5 March 2014
Mar. 5 – More on Dropbox
Did you know you can invite me to one of your Dropbox folders?
If you follow these instructions then you'll never have to send links to me again. Anything you put in the folder will automatically be shared with me!
- Log into Dropbox.
- Create a new folder called "Art YourLastName YourFirstName".
- Click on the link to invite me to the folder.
- Now save everything to that folder.
If you follow these instructions then you'll never have to send links to me again. Anything you put in the folder will automatically be shared with me!
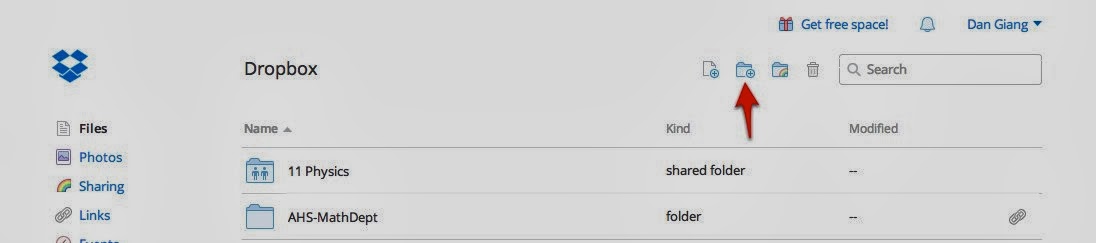 |
| Create a new folder. Name it "Art LastName FirstName" |
 |
| Highlight the folder and invite me to join it. |
Finish up your marker drawings before the March Break!
Tuesday, 4 March 2014
Mar. 4 – Matting and Displaying Artwork
At this point many of you are finishing up at least one of the contour drawings so I went over how to matt them for display. I showed you the proper way to cut your matting paper using a knife and the proper way to cut with a knife taking safety into account.
Once your work is matted, you need to make a label that includes the following:
Artist:
Title:
Medium: Marker Pen on Paper
Date: 2014
Then your work will be ready for display!
Once your work is matted, you need to make a label that includes the following:
Artist:
Title:
Medium: Marker Pen on Paper
Date: 2014
Then your work will be ready for display!
Monday, 3 March 2014
Mar 3 – Contour Drawings
Last week we did blind contour drawings and a lot of you felt very uncomfortable with it. So today we repeated the exercise allowing you to look at your paper. We'll put the final results side by side and see what the difference is. You might be surprised!

At this point, you should have two contour portraits of your partner. One blind, and one not blind. You should be colouring both of them in with markers so that none of the paper is showing.
Reminder: Your one point perspectives are now overdue! Anyone who has not send me the files on dropbox must do so ASAP!.
Subscribe to:
Comments (Atom)