At this point you should all be priming your boxes for the final painting. Remember to do your visual research and find as many images as you can to support your work. This research is part of your mark!
All other projects have been marked and entered on TeachAssist. Please log in and have a look. Any zeroes or missing marks mean I did not receive your work. Please come see me if that is the case.
Friday, 23 May 2014
Thursday, 15 May 2014
May 15 – Culminating Summative Assigned
Only one month left before the end of the school year!
Today I introduced our culminating summative assignment that will be worth 30% of your final mark.

Today I introduced our culminating summative assignment that will be worth 30% of your final mark.
The project involves making your own graffiti boxes. Here are some examples of street art to give you some ideas:
 |
| This one makes use of the shape of the box and the ticket dispenser to create a face. |
 |
| The tree behind the wall is incorporated into this piece. |
 |
| The alligator is shaped this way to fit around the building, making great use of the space. |
 |
| Banksy is a famous street artist who's work interacts with the space around it, going off the walls around corners and through the streets. |
The "space" you will be given are wooden boxes. Your task is to transform the box with your own graffiti art.
Good luck!
Friday, 9 May 2014
May 9 – Colour Theory Practice
Today we discussed colour theory!
Handout
Take the time to try and get a good colour wheel and practice those value scales.

Friday, 2 May 2014
May 2 – Painting Clay Boxes
At this point most people are done the printmaking assignment, good work everyone! If you are still working on it, please finish up.
We are now painting our clay boxes. Take this as a practice and opportunity to experiment with acrylic paint. Try using it with water (wet) and without water (dry). Remember that acrylics dry quickly and it's possible to layer many colours over each other. We will do more painting exercises soon, for now, have fun with the paint!
We are now painting our clay boxes. Take this as a practice and opportunity to experiment with acrylic paint. Try using it with water (wet) and without water (dry). Remember that acrylics dry quickly and it's possible to layer many colours over each other. We will do more painting exercises soon, for now, have fun with the paint!
Wednesday, 23 April 2014
Apr. 23 – Printmaking
By now you should be starting to test your prints by making some artist proofs. After your proofs, you can go back and clean up your carving if you like, but once you start your good copies, you can no longer carve the block!
When you are all done your prints, you will mount the best one on construction paper, like we did for the marker drawings and prepare it for display. I discussed how you can use newsprint to make a mini folder to keep your prints together and hand them in.
As a reminder here's are the prints I am going to mark (I have already marked your thumbnail sketches. If you have not handed them in, do so NOW).
Keep practicing your proofs until you are ready and confident that you can do a good job on the nice paper! There is a limited number of good paper available.
When you are all done your prints, you will mount the best one on construction paper, like we did for the marker drawings and prepare it for display. I discussed how you can use newsprint to make a mini folder to keep your prints together and hand them in.
As a reminder here's are the prints I am going to mark (I have already marked your thumbnail sketches. If you have not handed them in, do so NOW).
- 1 artist proof
- 3 black and white prints
- 1 enhanced print (experimenting with different colours)
Keep practicing your proofs until you are ready and confident that you can do a good job on the nice paper! There is a limited number of good paper available.
Wednesday, 16 April 2014
Apr. 16 – Printing
Today I showed you how to roll out your ink and make your prints! It'll take a lot of practice to do it correctly so make some artists proofs and make sure you get it right before you move onto your good copies.
Here's what you need to hand in:
Here's what you need to hand in:
- 3 design sketches (including good copy)
- 1 artist proof
- 3 prints in black and white
- 1 enhanced print with multiple colours and additional paint
Monday, 14 April 2014
Apr. 14 – Cutting your block
Today I demonstrated how to property use the gouge to cut your rubber blocks to make your prints. Remember these are sharp tools that must be safely handled. You will lose marks if you use the tools unsafely!
Here's a great video that shows how to hold the gouge and where to safely place your fingers:
The rubber blocks you are using are softer than the lino block in the video. It should not take a lot of force to cut into your blocks. Be careful and take the time to do it right. The quality of your carving will effect the quality of ALL of your prints!
Wednesday, 9 April 2014
Apr. 9 – Introduction to Printmaking
Great work on they clay boxes everyone! Now we wait for the clay to dry out and then fire them in the kiln before we paint them.
In the meantime we start our new unit on print making. Have a look at the powerpoint:
Here is a very famous print.
In the meantime we start our new unit on print making. Have a look at the powerpoint:
Here is a very famous print.
 |
| The Scream, by Edvard Munch. |
This one was cut from wood, not linoblock like you will be using, but the idea is the same.
Have a look at your assignment and rubric. The first step is to come up with some ideas.
Tuesday, 25 March 2014
Mar. 25 – Clay boxes
Today I showed you the slab technique. Use pieces of wood for support and a rolling pin to roll out slabs of equal thicknesses. Then you use the templates you created to cut out the correct shapes. These are the slabs that you will piece together to build your box. You can trim and refine the pieces to make them fit smoothly together, don't forget to slip and score each side as you join them together.
Remember to look at the handout for step by step instructions.
Remember to look at the handout for step by step instructions.
Monday, 24 March 2014
Mar. 24 – Clay Practice
Today we finished up the clay rhinos.
Make sure you have your templates for your box ready by tomorrow. Those of you who did not bring in bags, rags and a container, please do so.
Make sure you have your templates for your box ready by tomorrow. Those of you who did not bring in bags, rags and a container, please do so.
Friday, 21 March 2014
Mar. 21 – Clay Practice
Today we started with the clay!

The goal today was to make a simple clay rhino. This is practice before we get into your clay boxes. Have a look at this video:
Next week we will start working your clay boxes.
Remember the most important thing about working with clay is proper clean up. Do not wash clay down the sink and scrub down the tables after use. Dried clay dust can be dangerous if inhaled, so make sure you keep your workspace clean.
Wednesday, 19 March 2014
Mar. 19 – Clay Box Templates
Today I showed you how to make templates for your clay boxes. These are the life-size designs that you'll use to know what size to cut our your clay to. Have a look at this handout for thorough instructions on how to make a clay box.
Handout: Clay Box Instructions
Your thumbnails should be finished today and your templates done tomorrow. Friday we start with the clay!
Handout: Clay Box Instructions
Your thumbnails should be finished today and your templates done tomorrow. Friday we start with the clay!
Tuesday, 18 March 2014
Mar. 18 – Thumbnail drawings
Today you should be drawing your thumbnail sketches for your clay boxes. Remember you need to sketch the front, back, left and right views. Your thumbnail sketches should be in full colour.
Homework: Bring plastic bags and cloth rags to keep your clay moist while you're working on it. Also bring a plastic container with a lid to keep your work safe.
Here's an example of a clay box made by artist Katie Deits, clearly showing four sides of her work.
Of course, your box will be covered with your own gargoyles, gods and other monsters.
Homework: Bring plastic bags and cloth rags to keep your clay moist while you're working on it. Also bring a plastic container with a lid to keep your work safe.
Here's an example of a clay box made by artist Katie Deits, clearly showing four sides of her work.
 |
| "Gandhi, The Path to Freedom" Sculpture By Katie Deits c2002 |
Of course, your box will be covered with your own gargoyles, gods and other monsters.
Monday, 17 March 2014
Mar. 17 – Gargoyles and Gods
Welcome back form your break!
Today I introduced the next assignment:
Where is this famous gargoyle?

It's at Notre Dame in Paris! Gargoyles are mythical creatures built into buildings as a sign of protection. Around the world we see different sculptures that are built into buildings for religious, spiritual, or cultural reasons. Have a look at some of these examples:


Even on our own Parliament building in Ottawa:

Your task is to build a clay box and cover with sculptural images of mythical creatures. As some examples, use the internet to search for Romanesque Gargoyles or classic Greek gods. You can also draw from any cultural background you choose. You will need to sketch some thumbnail plans to start with and show that you have done the background searches.
Have a look at the handouts for full instructions.
Handouts
Today I introduced the next assignment:
Where is this famous gargoyle?
It's at Notre Dame in Paris! Gargoyles are mythical creatures built into buildings as a sign of protection. Around the world we see different sculptures that are built into buildings for religious, spiritual, or cultural reasons. Have a look at some of these examples:
Even on our own Parliament building in Ottawa:
Your task is to build a clay box and cover with sculptural images of mythical creatures. As some examples, use the internet to search for Romanesque Gargoyles or classic Greek gods. You can also draw from any cultural background you choose. You will need to sketch some thumbnail plans to start with and show that you have done the background searches.
Have a look at the handouts for full instructions.
Handouts
Wednesday, 5 March 2014
Mar. 5 – More on Dropbox
Did you know you can invite me to one of your Dropbox folders?
If you follow these instructions then you'll never have to send links to me again. Anything you put in the folder will automatically be shared with me!
- Log into Dropbox.
- Create a new folder called "Art YourLastName YourFirstName".
- Click on the link to invite me to the folder.
- Now save everything to that folder.
If you follow these instructions then you'll never have to send links to me again. Anything you put in the folder will automatically be shared with me!
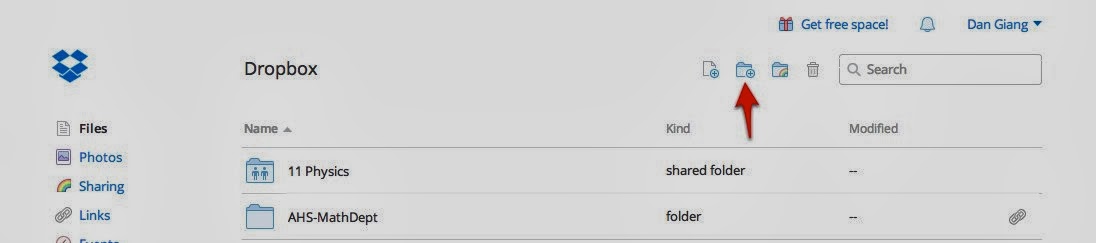 |
| Create a new folder. Name it "Art LastName FirstName" |
 |
| Highlight the folder and invite me to join it. |
Finish up your marker drawings before the March Break!
Tuesday, 4 March 2014
Mar. 4 – Matting and Displaying Artwork
At this point many of you are finishing up at least one of the contour drawings so I went over how to matt them for display. I showed you the proper way to cut your matting paper using a knife and the proper way to cut with a knife taking safety into account.
Once your work is matted, you need to make a label that includes the following:
Artist:
Title:
Medium: Marker Pen on Paper
Date: 2014
Then your work will be ready for display!
Once your work is matted, you need to make a label that includes the following:
Artist:
Title:
Medium: Marker Pen on Paper
Date: 2014
Then your work will be ready for display!
Monday, 3 March 2014
Mar 3 – Contour Drawings
Last week we did blind contour drawings and a lot of you felt very uncomfortable with it. So today we repeated the exercise allowing you to look at your paper. We'll put the final results side by side and see what the difference is. You might be surprised!

At this point, you should have two contour portraits of your partner. One blind, and one not blind. You should be colouring both of them in with markers so that none of the paper is showing.
Reminder: Your one point perspectives are now overdue! Anyone who has not send me the files on dropbox must do so ASAP!.
Friday, 28 February 2014
Feb. 28 – Marker Pen Drawings
Learning Goals:
Today we started a new project: Marker Pen Drawings!
We first practice by doing some contour drawings from the handou

- Use the technique of blind contour drawing.
- Use the elements and principles of art to complete and display your artwork.
Success Criteria:
- You complete a blind contour portrait and prepare it for display while considering the elements and principles of art.
Today we started a new project: Marker Pen Drawings!
We first practice by doing some contour drawings from the handou
Then we did three minute blind contour drawings of each other and coloured them in using markers.
Here's a example of what they look like:
Thursday, 27 February 2014
Feb. 27 – Work Period
Today we spent wrapping up the one-point perspective drawings. Remember you need to photograph your finished piece and upload it on Dropbox to complete it. Include a word file that describes your work. Here is what you need to do:
Next I gave a handout on drawing facial features. Try to copy these images into your sketch book.
Handout: Drawing Faces
- Upload a good photo of your portfolio to Dropbox and share it with dan.giang@yrdsb.edu.on.ca
- Upload a word file with the following descriptions of your portfolio
- Artist: (Your name)
- Title: (title for your work)
- Size: 8.5" x 11"
- Medium: graphite (pencil crayon) on paper
- Date: Feb. 27, 2014
- Rational: (Describe the project and what you were trying to do, 50 words.)
Next I gave a handout on drawing facial features. Try to copy these images into your sketch book.
Handout: Drawing Faces
Wednesday, 26 February 2014
Feb. 26 – Drawing Skills: Blind Contours
Today we tried a different technique called blind contours. We tried to draw without lifting our pencil off the page and without looking at the paper either.

We drew for different lengths of time from 10 seconds up to 3 minutes. Many of you still have to work on using up the whole page. You also have to work on the hardest part, drawing what you see instead of what you think you see. This is a hard process and we'll have to continue working on it.
We drew for different lengths of time from 10 seconds up to 3 minutes. Many of you still have to work on using up the whole page. You also have to work on the hardest part, drawing what you see instead of what you think you see. This is a hard process and we'll have to continue working on it.
Tuesday, 25 February 2014
Feb. 25 – Drawing Skills: Gesture drawings
Today we took a break from the rigid rules of perspective and practiced some more free forms of drawing. I introduced a technique called gesture drawing. Gesture drawings are quick sketches that are concerned only with capturing form and movement.

We took turns doing gesture drawings of each other. We started with 10 seconds, then 30 seconds, up to 1 and 2 minute sketches.
I saw some good work, but many of you also had trouble letting go of your urge to focus on details.
Afterwards, we went back to our perspective drawings. The images and descriptions are due in your drop box by Friday, Feb. 28.
Thursday, 20 February 2014
Feb. 20 – Breaking the rules of one-point perspective
Today we looked at more examples of the rules of perspective and what happens when you break these rules!
Remember, these rules were discovered in the 1500's by an architect named Filippo Brunelleschi.

Brunelleschi used a system of mirrors to figure out what these rules of perspectives are.

Other artists started using these rules. Can you figure out where the vanishing point is in this painting?

After artists learned these rules, they began to break them. An artist named M. C. Escher came along and made some amazing works that twister our idea of perspective. Have a look at some of his work.


This last one is quite complex and takes a video to really explain what is happening.
Of course, to make these kinds of effects, you have to first learn the rules of perspective.
Continue working on your name project!
Remember, these rules were discovered in the 1500's by an architect named Filippo Brunelleschi.
Brunelleschi used a system of mirrors to figure out what these rules of perspectives are.
Other artists started using these rules. Can you figure out where the vanishing point is in this painting?
After artists learned these rules, they began to break them. An artist named M. C. Escher came along and made some amazing works that twister our idea of perspective. Have a look at some of his work.
This last one is quite complex and takes a video to really explain what is happening.
Of course, to make these kinds of effects, you have to first learn the rules of perspective.
Continue working on your name project!
Wednesday, 19 February 2014
Feb. 19 – 1 Point Perspective
Today we continued with our one-point perspective drawings of your name. Here's the rubric:
Handout: One-point Perspective Rubric
Most of you are ready to start on your good copy. Keep up the good work!
Handout: One-point Perspective Rubric
Most of you are ready to start on your good copy. Keep up the good work!
Tuesday, 18 February 2014
Feb. 18 – 1 Point Perspective Assignment
Today we looked at everyone's portfolio and voted on which ones we liked the best. Whey did we like the ones who chose? What made them good? We tried to explain it using the elements and principles of design.
Next, we started an assignment on one-point perspective. You are to draw your name making each letter 3-dimensional using the rules of perspective. Then you can shade it all in using the practice we did for values.
Handout:
Next, we started an assignment on one-point perspective. You are to draw your name making each letter 3-dimensional using the rules of perspective. Then you can shade it all in using the practice we did for values.
Handout:

 |
| Example of how to draw a letter using one-point perspective. |
Friday, 14 February 2014
Feb. 14 – Drawing Skills: One Point Perspective
Learning Goals: Understand and apply the rules of one point perspective.
Success Criteria: You can draw a cube using one point perspective above, below and on the horizon line.
Today I discussed some art history with you. We briefly looked at art from different eras and regions such as these images:


One thing you can see about all these historic drawings and paintings is that they look very flat. At what point did people start drawing the illusion of 3D? Let's look at the last image as an example. Look at the progression in these images that all show the same subject matter:

What did Da Vinci do to make his image look so much more three dimensional than the others? Leonardo lived and worked in a time we now call the Renaissance (around 1500s). During this time an architect known as Filippo Brunelleschi came up with the rules of linear perspective. Using these rules, artists were able to create the illusion of depth and space on a flat surface. Look at this fresco by Raphael to see more examples of these rules:

Handout: Perspective
Then I went through, step by step, how to draw a cube using one point perspective.
Success Criteria: You can draw a cube using one point perspective above, below and on the horizon line.
Today I discussed some art history with you. We briefly looked at art from different eras and regions such as these images:
One thing you can see about all these historic drawings and paintings is that they look very flat. At what point did people start drawing the illusion of 3D? Let's look at the last image as an example. Look at the progression in these images that all show the same subject matter:
 |
| The Last Supper by Leonardo Da Vinci |
What did Da Vinci do to make his image look so much more three dimensional than the others? Leonardo lived and worked in a time we now call the Renaissance (around 1500s). During this time an architect known as Filippo Brunelleschi came up with the rules of linear perspective. Using these rules, artists were able to create the illusion of depth and space on a flat surface. Look at this fresco by Raphael to see more examples of these rules:
Handout: Perspective
Then I went through, step by step, how to draw a cube using one point perspective.
Checklist
Here are the tasks you should be doing at this moment in order of importance:
- Portfolio photo and word file in Dropbox shared with me (see previous post.)
- Value drawings from yesterday.
- Three cubes from different angles using one point perspective, complete with shading and shadows.
Thursday, 13 February 2014
Feb. 13 – Drawing Skills: Value
Today I discussed how to add value to your graphite drawings, in other words, shading. I gave each of you a 2B drawing pencil. These our yours to keep!

We started with a greyscale and then moved on to shading a cube and a sphere.
Handout: Shading Techniques
Assignment Due: Digital Portfolio
Remember you must take a picture of your portfolio for drop box and share it with me. Here's a checklist of what you need to do.
Remember you must take a picture of your portfolio for drop box and share it with me. Here's a checklist of what you need to do.
- Upload a good photo of your portfolio to Dropbox and share it with dan.giang@yrdsb.edu.on.ca
- Upload a word file with the following descriptions of your portfolio
- Artist: (Your name)
- Title: (title for your work)
- Size: (width x height)
- Medium: Pencil crayon and marker on Bristol board.
- Date: Feb. 12, 2014
- Rational: (Describe the project and what you were trying to do, 50 words.)
This is due at the end of class on Friday, that's tomorrow!
Wednesday, 12 February 2014
Feb. 12 – Digital Portfolio Assignment
The Art Department at our school has decided to use Dropbox to keep digital portfolios. This will allow you to have a free, digital copy of all your work that is accessible from anywhere with internet access.
More help with Dropbox
If you're new to Dropbox, have a look at these instructions on how to upload and share your work with me. Remember, you have to let me know you've uploaded your work by sharing the link with me. My email address is dan.giang@yrdsb.edu.on.ca


Here's what you need to do, visit this link and sign up for an account:
Now upload photos of your work. That's it!
Here are further instructions about how your photos will be marked. You will need to include a word file that describes your work.
Handout: Digital Portfolio Assignment
You have the option of installing a Dropbox App on your phone or computer at home, but that is not required.
More help with Dropbox
If you're new to Dropbox, have a look at these instructions on how to upload and share your work with me. Remember, you have to let me know you've uploaded your work by sharing the link with me. My email address is dan.giang@yrdsb.edu.on.ca
Tuesday, 11 February 2014
Feb. 11 – Work Period
More time was given today for you to finish your portfolios.
Tomorrow, please bring a digital camera or a phone that is capable of taking pictures. You will have to photograph all the work you do in this or any art class. If you do not have one, I will provide a camera for you, but if you have your own, please bring it.
Tomorrow, please bring a digital camera or a phone that is capable of taking pictures. You will have to photograph all the work you do in this or any art class. If you do not have one, I will provide a camera for you, but if you have your own, please bring it.
Friday, 7 February 2014
Feb. 7 – Pencil Crayon Techniques
Learning Goals: Create artwork using different media.
Success Criteria: You can use pencil crayons in multiple ways to create your portfolio.
Today we continued with our portfolio projects. We looked at some examples of pencil crayon artwork. Here are some examples of what is possible with pencil crayons:


The examples above are ones I found online. We also looked at portfolios from previous grade 9 students and looked at what worked well and what didn't.
Here are some things to think about when using pencil crayons:
Experiment with the above questions in mind and see what different effects you get. Then it comes down to you. You must decide what kind of effects you want on each part of your design.
Now go ahead and make an amazing design!
Success Criteria: You can use pencil crayons in multiple ways to create your portfolio.
Today we continued with our portfolio projects. We looked at some examples of pencil crayon artwork. Here are some examples of what is possible with pencil crayons:
The examples above are ones I found online. We also looked at portfolios from previous grade 9 students and looked at what worked well and what didn't.
Here are some things to think about when using pencil crayons:
- How sharp is the pencil?
- What angle will you hold it at?
- How hard should you press?
- Will you colour with straight lines, circles or scribbles?
- What do the colours look like when you put them on top of each other?
Experiment with the above questions in mind and see what different effects you get. Then it comes down to you. You must decide what kind of effects you want on each part of your design.
Now go ahead and make an amazing design!
Thursday, 6 February 2014
Feb. 6 – Work period
Today and tomorrow will be work periods for you to complete your portfolio projects. Remember to look at the rubric and complete the written component on the back. You will need to describe how you incorporated the elements and principles into your work.
Handout: Portofolio Design Rubric
At this point, everyone should be done the planning and started on the actual portfolio.
Handout: Portofolio Design Rubric
At this point, everyone should be done the planning and started on the actual portfolio.
Wednesday, 5 February 2014
Feb. 5 Class
Learning Goals: Understand the elements and principles of design.
Success Criteria: You can use the elements and principles of design in your artwork.
Handouts:
Success Criteria: You can use the elements and principles of design in your artwork.
Handouts:
- Elements and Principles of Design handout
- Elements and Principles PowerPoint
- Portfolio Design Evaluation Rubric
Today we looked at the drawings that you guys did yesterday of your ideal art class. Most people drew images of happy students enjoying an art class. I hope you will all work together to build this positive happy atmosphere.
Next we looked at the elements and principles of design. Have a look at the handouts and powerpoint. You will need to memorize these and be able to use them throughout your career as an artist.
We then continued to work on our portfolio designs. At this point, you should have your 6 thumbnail sketches complete and starting to work on your full sized portfolio.
Tuesday, 4 February 2014
First Class
Hi Everyone,
Welcome to Dr. G's Grade 9 Art Class!

Here's the course outline: Course Outline
You also filled out these: Student Information Sheets
Today we got to know each other a little. All of you drew what you thought would be the ideal class. We then talked about the type of art you will be doing this semester.
And here's the rubric for the first assignment: Portfolio Design Rubric
In the first assignment you will be decorating the portfolios that will be storing your work for the entire semester. These portfolios must reflect you and show the world who you are. You will be evaluated on how well you can do this and how well you incorporate the elements and principles of design. More on that later, for now, just start some sketches to get some ideas on paper.
Sketchbooks are highly recommended, but not required.
Looking forward to a great term!
Welcome to Dr. G's Grade 9 Art Class!
Here's the course outline: Course Outline
You also filled out these: Student Information Sheets
And here's the rubric for the first assignment: Portfolio Design Rubric
In the first assignment you will be decorating the portfolios that will be storing your work for the entire semester. These portfolios must reflect you and show the world who you are. You will be evaluated on how well you can do this and how well you incorporate the elements and principles of design. More on that later, for now, just start some sketches to get some ideas on paper.
Sketchbooks are highly recommended, but not required.
Looking forward to a great term!
Subscribe to:
Comments (Atom)